Tips on setting up Zoom meetings

Overview

What is Zoom bombing? Zoom bombing is a type of cyber harassment that involves the uninvited intrusion of strangers or internet trolls into Zoom or video conference calls with the purpose of causing disruption (e.g., sharing obscene images, abrupt noises, etc.). They gain access to meetings and hijack control from the host by sharing their screens and bombarding participants with inappropriate material (Ling, et al., 2021).

By: Reginald Govender

Instructional Guide: Zoom setting can be accessed via

Step 1: The Zoom web portal | images in this guide noted with green outlining

  • Go to https://zoom.us/ and log into your account
  • Along the left-hand side >> click on Settings

I will ONLY cover some of the key settings in this guide. Please browse the setting page (web portal); several features can be turned ON or OFF.

Step 2: The Zoom app (limited access to setting) | images in this guide noted with blue outlining

Note: Check the settings of your Zoom account online.

Some tips on preventing Zoom bombing:

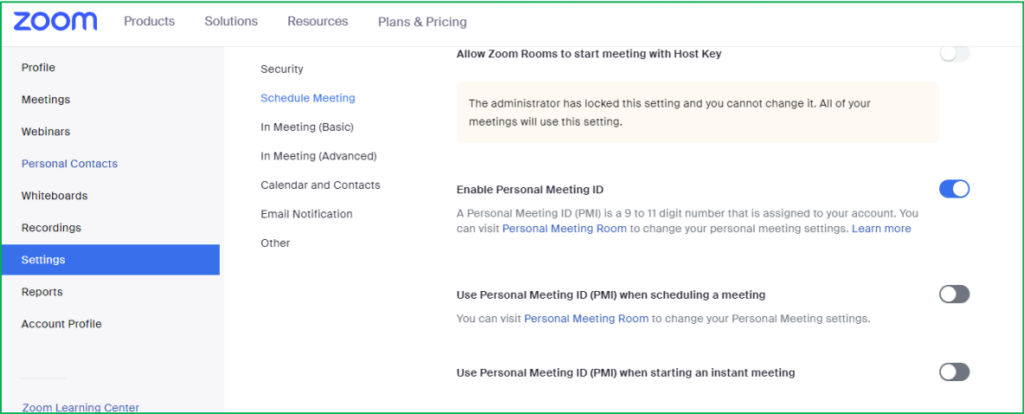
Step 1: Setup your Zoom meeting with a random ID

The Personal Meeting ID is like a phone number that is unique. For example, if the number is shared on social media, you can get unknown individuals joining your meetings anytime. If you have a small group of known participants or recurring meetings, it might be ideal to keep “Use Personal Meeting ID” ON. However, generating the meeting ID automatically (randomly generated) is best. You can also toggle off the personal meeting ID ON via the Zoom web portable.

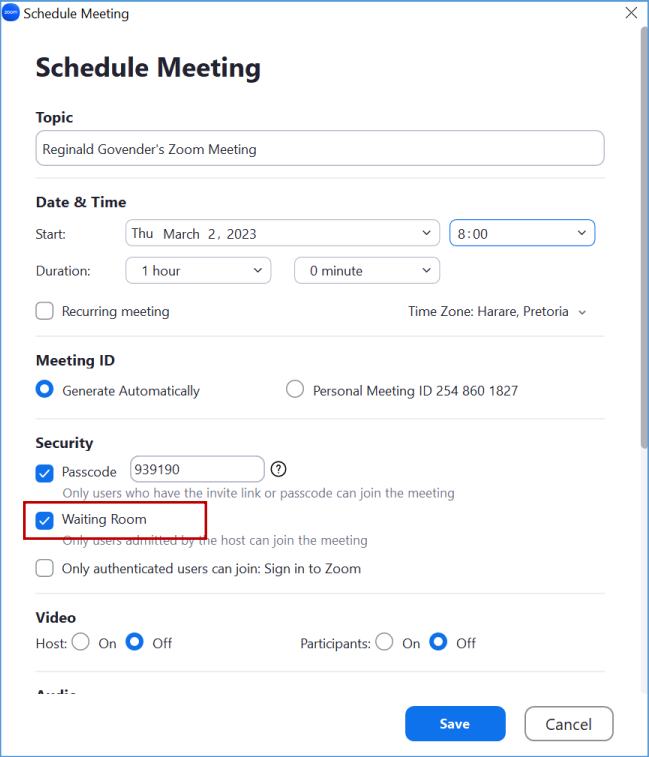
Step 2: Waiting Room

The waiting room will prevent participants from joining before you (the host). In addition, it will prevent participants from abruptly joining during the meeting. The host/co-host will get notified and will be able to admit participant/s.

Step 3: During the meeting- place participant/s in the waiting room OR remove them from the meeting

  • Click on “Participants” (the participants pane will appear along the side)
  • Hover above the participant you want to remove or place in waiting room >> click on the three dots (the menu will extend) >> select “Put in waiting room” or “remove”

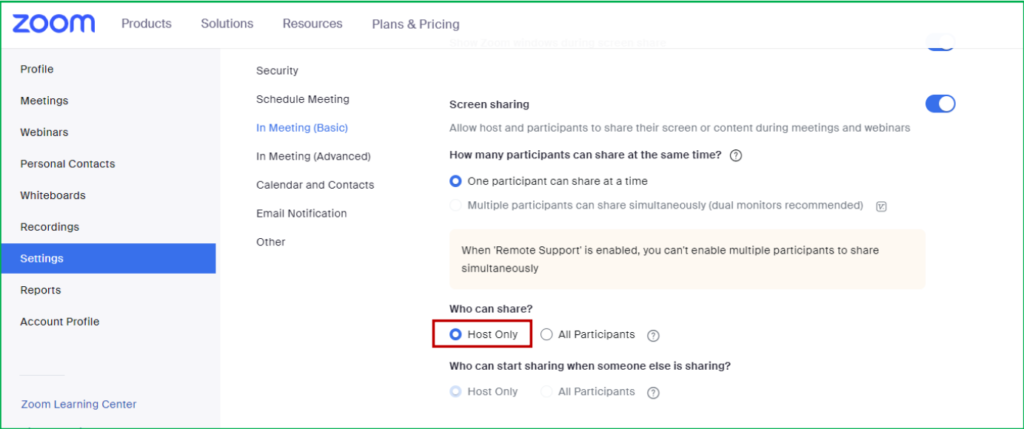
Step 4: Screen share control

  • Adjust the setting during a Zoom meeting
    • Click on the little upward arrow (^) by “Screen Share”
    • Make the necessary changes. Select “Host only”
  • Adjust the setting prior to the Zoom meeting (go to the Zoom web portal)

Step 5: Disable participant audio

  • Prior to the Zoom meeting
  • Go to the schedule meeting menu you can mute participants upon entry OR in the Zoom web portal
  • Preventing participants from unmuting themselves during a Zoom meeting
    • Click on Participants
    • Select “Mute All”

Note: Participants may still unmute themselves

To prevent participants from unmuting:

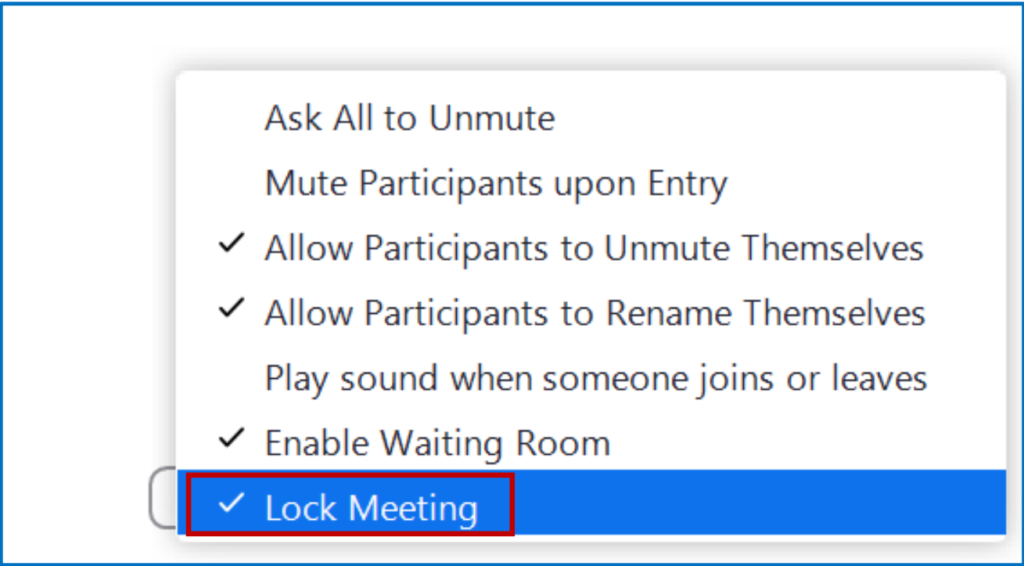
  • Click on the three dots (…) next to “Mute All” to expand the menu >> uncheck “Allow participants to unmute themselves”

Step 6: Lock your meeting

  • After a few minutes into the Zoom session, you can lock your meeting. This will prevent new users from joining.
  • Follow the steps in 5.2
  • Make sure to check “Lock Meeting”

Step 7: Prevent participants from rejoining and renaming themselves

  • Go to the Zoom web portal
    • toggle OFF “Allow removed participants to rejoin”
    • toggle OFF “Allow participants to rename themselves”

Step 8: Chat settings

  • You can disable the chat to prevent inappropriate conversations/ unseen conversations while you are talking
  • Go to the Zoom web portal >> You can toggle the chat feature ON or OFF
  • Take note of the other chat feature settings such as “Autosave”, etc

Step 9: Stop participants from controlling your screen

  • Stop participants from sharing content”, etc
  • Stop participants from sharing a whiteboard >> select Whiteboard >> Select Host Only
  • Stop participants from writing all over your presentation/screen.
  • Start sharing a whiteboard >> Select More >> Select Disable Annotation for Others

Step 10: Register on Zoom

  • A Zoom register can be useful for determining attendance and time spent per participant.
  • Preparation before the meeting: Make it a rule in your course that participants must join the Zoom meeting either with their registered student name or student number (student number is ideal since you may have two or more students with the same name).
    • Make sure students cannot change their name
      • Can be done before the Zoom meeting >> go to the Zoom web portal
      • Can be done during the Zoom meeting
      • Follow step 5.2 >> uncheck “Allow Participant to rename themselves”
  • After the meeting:
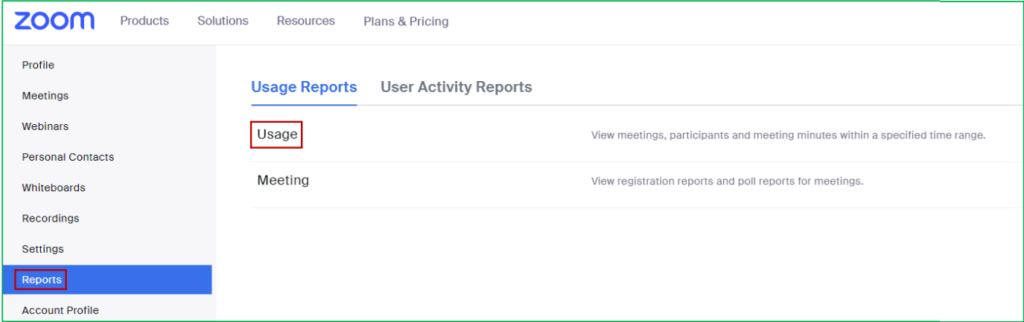
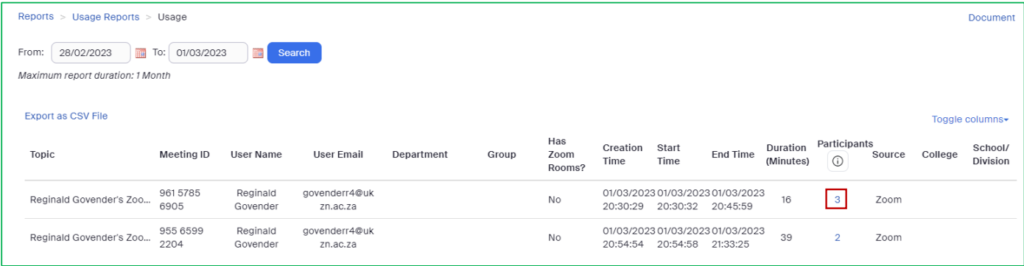
    • Go to the Zoom web portal >> Reports >> Usage
  • Select the number under “Participants” for the meeting you want the register for
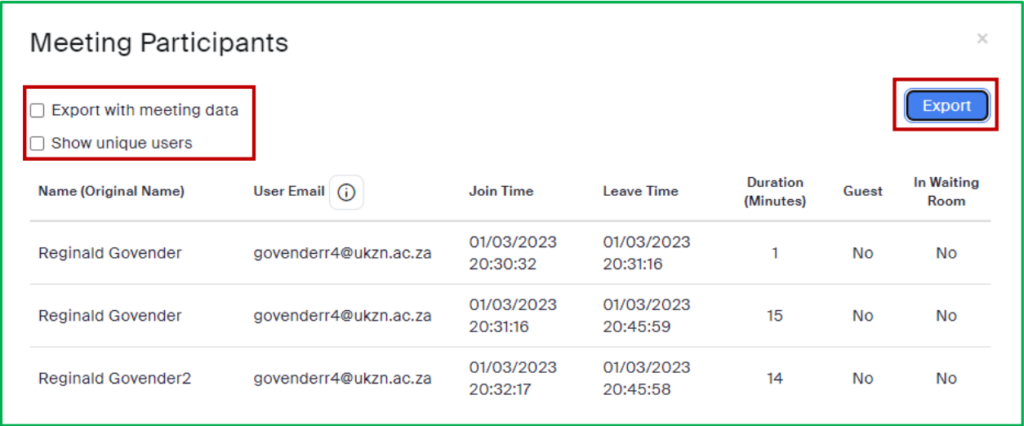
  • Select “export with meeting data’ or “show unique users” (duplicate user times are merged) >> Select Export (a .csv file will automatically download on your computer)
  • Take away points…
    • Reviewing the Zoom settings is essential when scheduling your Zoom meeting. For example, in some cases, you may want the participant to share their screen or you might want to enable the chat for peer discussion among participants;
    • Never share the Zoom meeting link on social media. For example, if the link is shared on WhatsApp, it can be forwarded to multiple persons (students not registered for your module or non-students). Send the meeting invite via your UKZN email so it is an official communication;
    • Use the waiting room so that participants don’t join before you (the host);
    • Only admit students with profile names that show their registered student name OR student number;
    • Lock the meeting once you know all participants are joined; • Keep in mind that some participants may have network issues etc. Prior to the meeting, send an email notifying them to be in an area with good connectivity, have fully charged devices and routers (in case of load shedding), etc.;
    • If any participant is Zoom bombing your meeting, you can remove them – you are in control!

Reginald G. Govender | Computer Sc Edu

iSiZulu Version »