Instructional Guide: Learn Assignment

Overview

The assignment activity provides a space into which students can submit work for teachers to grade and give feedback on. This saves on paper and is more efficient than email. It can also be used to remind students of ‘real-world’ assignments they need to complete offline, such as art work, and thus not require any digital content.

Student submissions are together on one screen of your course. You can require them to submit one or several files and/or to type text essays. It is possible to have them submit work as a group and you can also choose as a teacher to grade their work ‘blind’ in other words not to see the identities of those who have submitted assignments. Assignments can have deadlines and cut off dates – which you can also extend if necessary.

When To Use

When a lecturer needs to conduct formative assessments, collect them and provide grades and feedback.

Instructional Guide

Add an Assignment

Step 1:

  • Log in to Moodle by clicking here.

Step 2:

  • On your course page, click Turn editing on (top right). Editing icons and links will appear.

Step 3:

  • Locate the Section where you want to add the assignment (If you are using the collapsed topics format, open the Section).

Step 4:

  • At the bottom-right of the Section, select + Add an activity or resource. The Activity Chooser will open.

Step 5:

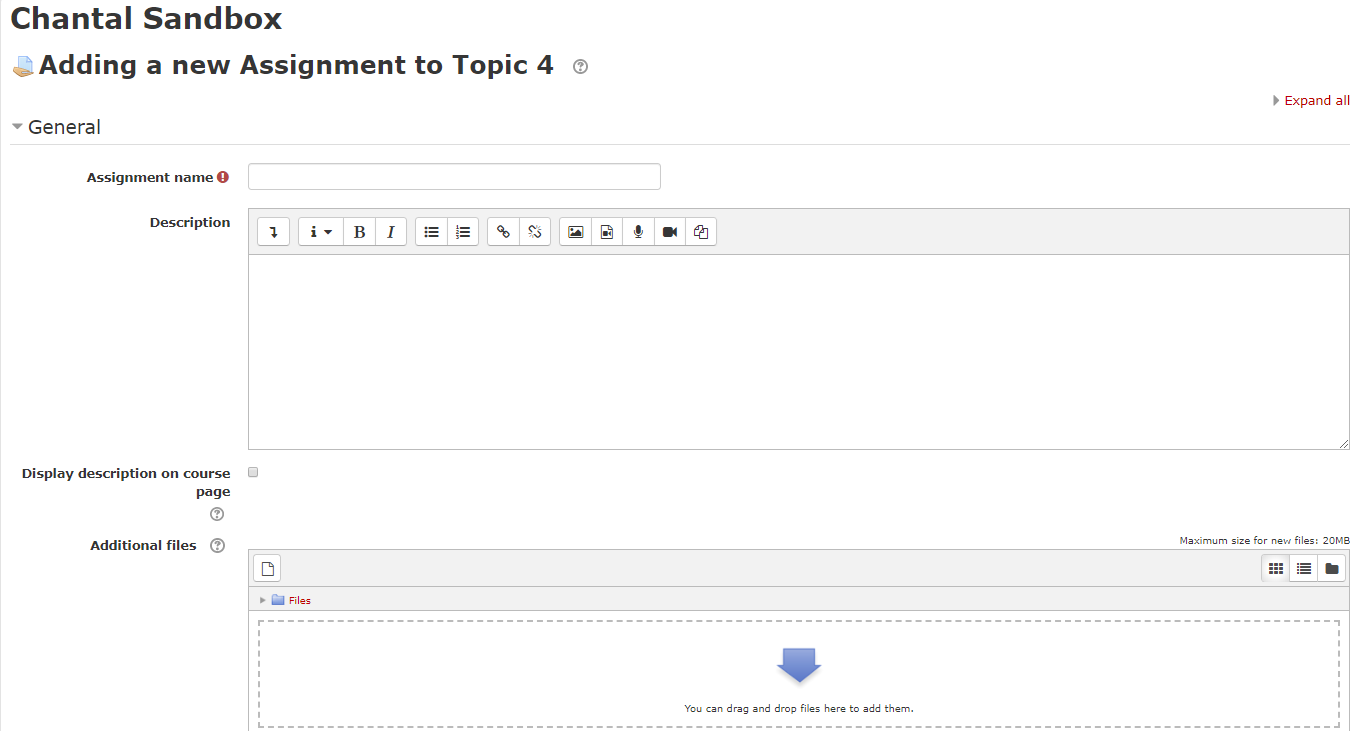
  • In the Activity Chooser, select Assignment and select Add. The Adding a new Assignment page will open.

Step 6:

  • Configure the assignment options. The page opens with GeneralAvailability, and Submission types settings in view.

Step 7:

  • Select topic headings to make additional settings for submission types, grading, groups, etc., or select Expand all (top right) to view all possible settings. Select Save and return to course to return to your main course page, or Save and display to view the assignment page.

Assignment Options

General

  • Assignment name (required)
    This name displays as a link on your course page. Use something unique that clearly identifies this assignment from other course activities. We also recommend keeping the name short.
  • Description (optional)
    Enter a summary of the assignment and instructions. You can also Display description on course page. Select this option to display the description underneath the assignment link on your course page. (This works best if the description is very concise).
  • Additional files
    Drag and drop files into the upload field to append the file to the assignment Description.

Availability

  • Select Enable checkboxes to set a date and time for:

    • Allow submissions from
      Determines when students can begin to submit to the assignment.
    • Due date
      Determines when the assignment will be due. The due date will show in the course Calendar and within the Activities block.
    • Cut-off date
      Determine when the assignment will no longer accept submissions.

Submission Types

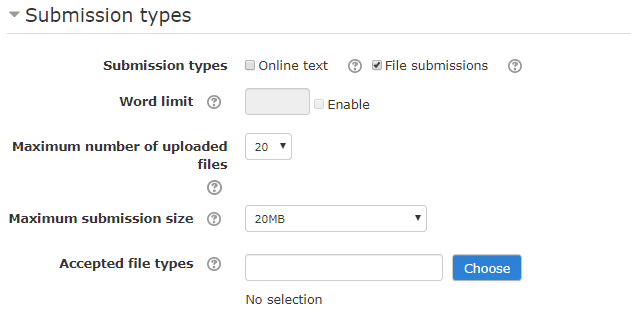
  • Submission types
    With Online text, students can enter text directly into an editor.  If File submissions are enabled, students can upload one or more files. 
    Note: To create an offline assignment where students will submit or perform work outside Moodle, leave both Online text and File submissions unchecked. You can still provide a description, set due dates, and have the activity shown in the course Calendar and Gradebook.
  • Maximum number of uploaded files
    If file submissions are enabled, each student will be able to upload up to the set number of files for their submission.
  • Maximum submission size
    If file submissions are enabled, each upload cannot exceed this file size per upload. (If a student can upload multiple files, and uploads files at different times, the total can exceed the set size.)
  • Accepted file types
    To limit submissions to specific file types, select ChooseA pop-up window will open with file type options. Select the file types for which submissions you would like to enable by clicking the radio button next to each option. Select Save changes.

Feedback Types

  • Feedback comments
    If enabled, graders can provide written feedback for each submission. These comments are from the grader to the student.
  • Feedback files
    If enabled, graders can upload files containing feedback when marking assignments. For example, you can upload marked student submissions, documents with comments, or spoken audio feedback.
  • Offline grading worksheet
    If enabled, graders can download a spreadsheet to enter grades without having to be logged in to Moodle. This can be useful if you anticipate grading while disconnected from the Internet.
  • Comment inline
    If enabled, the submission text will be copied into the feedback comment field during grading, making it easier to comment inline or to edit the original text.

Submission Settings

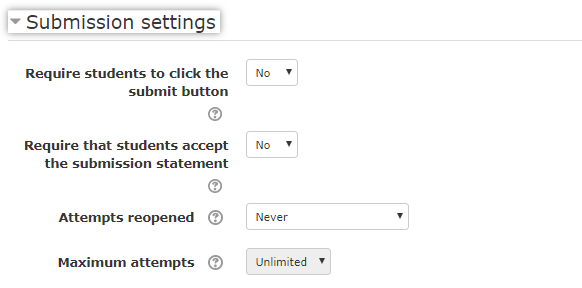
  • Require students to click submit button
    If enabled, students will have to select a Submit button to declare their submission as final. Requiring the Submit button allows students to keep a draft version of the submission on the system.
    Note: If this setting is changed from No to Yes after students have made submissions, the submissions will be regarded as final.
  • Require that students accept the submission statement
    If enabled, students will be shown a statement that declares they are submitting their own original work, and they will have to accept the statement before their submission is processed.
  • Attempts reopened
    If set to Manually, the student’s submission can be reopened by a teacher. If set to Automatically until pass, the student’s submission is automatically reopened until the student achieves a passing grade (defined under Grade).
  • Maximum attempts
    The maximum number of submission attempts that can be made by a student. After this number of attempts has been made, the student’s submission will not be able to be reopened.

Group submission settings

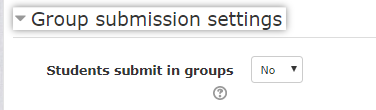
  • Students submit in groups
    If enabled, students submit work together in groups rather than individually. For example, a group of students can submit one file that contains the joint work of the group.
  • Require all group members submit
    If enabled, all students in a group must individually select the Submit button in order to acknowledge that they are signing off on their group’s joint submission.
    Note: This option is available only if both the Students submit in groups, and Require students to select submit button are enabled.
  • Grouping for student groups
    If Students submit in groups is enabled, this option shows which Grouping has been selected in the Common module settings (see below).

Notifications

  • Notify graders about submissions
    If enabled, instructors and TAs will receive an email alert whenever a student makes a submission. (This may not be manageable in a class with a large number of students)
  • Notify graders about late submissions
    If enabled, instructors and TAs will receive an email alert whenever a submission is made after the due date.
  • Default setting for “Notify students”
    If enabled, the default setting for notifying students when grades are released will be set in the assignment grading interface. This can be changed manually during grading.
  • Note: Students always receive an email confirmation when a submission is successfully made.

Grade

  • Grade
    Select the Grade Type:
    None – The assignment will be ungraded and worth no points.
    Point – Grade out of a simple number of maximum points. Enter the maximum possible score for the assignment in the Maximum points field.
    Scale –  Select a preset or custom Scale from the Scale drop-down.
  • Grading method
    Choose Simple direct grading, Grading guide or Rubric to grade the assignment
  • Grade category
    Select a Category in your gradebook under which you would like the assignment grade to be placed.
  • Blind grading
    If enabled, instructors will not see student names when grading submissions.
  • Use grading workflow
    When enabled, grading an assignment goes through a series of workflow stages: Not graded, In grading, Grading completed, In review, Ready for release, and Released. 
  • Use grading allocation
    When both Use grading workflow and Use grading allocation are enabled, instructors can assign specific graders to grade specific students.

Restrict Access

  • Use Restrict Access settings with care and check for conflicts with other settings you may have made for the activity. Settings may prevent students from accessing restricted content, including grades and due dates.

    To add restrictions on accessing the activity, click Add restriction… The Add restriction window will open, containing the following options:

    • Date. To prevent access until (or from) a specified date and time.
    • Grade. To require students to achieve a specified grade.
    • User profile. To control access based on fields within the student’s profile.
    • Restriction set. To add a set of nested restrictions to apply complex logic.
  • If you have groups in your course, you will see the following additional options:

    • Group: To allow or prevent access only students who belong to a specified group, or all groups.
    • Grouping: To allow or prevent access only students who belong to a group within a specified grouping.

Edit an Assignment

  • While it is possible to edit the content or setup options for an existing assignment, proceed with caution if the assignment has already been released to students — especially if students have already submitted work. Changing some options, such as changing participants when working with groups, may result in student confusion and the loss of work that has already been submitted.

    To change the content or options for an assignment, you have already created:

    1. On your course page, click Turn editing on. 
    2. Next to the Assignment to update, click Edit, then select Edit Settings. The assignment’s settings page will open.
    3. The Updating Assignment page shows you the same options available on the Adding a new Assignment page. Here you may change your assignment options as needed, including changing the due date, grading information, and availability of the assignment.

    Once you have finished making the necessary changes, click Save and return to course at the bottom of the page.

iSiZulu Version »